
Using the Saddle Gauge:
So, you got your new gauge and now you’re ready to use it? You’ve come to the right place!
Part 1: GETTING TO KNOW YOUR SADDLEGAUGE
For best results, we recommend having someone help you use the SaddleGauge. The Helper’s job is to keep your horse on flat level ground, four feet on the floor, and it’s head facing straight forward not turned. No cocked rear legs, no eating hay off the ground, head as close to travel position as possible. (Using a pen please then fill out the form. ) What is this?
Take the Saddle Gauge out of the box. If the gauge is folded flat, you’ll need to open up the paddles. Be sure that you take note that the front of the gauge is where the logo is, the logo should be readable and upright. Fool around a few minutes to see how it bends. The spine has a joint in each middle, and each paddle moves as well. Please do not disassemble or loosen the hardware, it’s supposed to be tight so that you can lift it on and off numerous times without it sagging or changing.
The spines have notches with numbers and a pointer. You will be recording the position of this pointer on your paperwork. The paddles are similar, they too have numbers, however the pointer for the spines is the corner of the black square. You will be recording the positions of both the spines and wings.
If you need more copies of the gauge guide paperwork click here.
The goal: To get the bottom narrow edge of each paddle to touch along the edge on the animals back. Note in the photo (below) that the spine of the gauge is not exactly following the topline of the animal, that’s because to get the paddles to lay down sometimes you’ll need to change the spine shape. Don’t try to move the paddles or spine on the animal, rather take it off and move whatever part. Then place it back on. Your two sides may be quite different right to left, not to worry many equines are asymmetric. It’s important that each time you take it on and off that the spine of the gauge be right over the spine of the animal (as well as on the same tape marker in front if building the saddle on a specific tree).

F YOU ARE LOOKING FOR INSTRUCTIONS ON HOW TO BUILD A SADDLE ON A SPECIFIC TREE THEN PLEASE SKIP TO PART 3
Part 2: TESTING OUT AN EXISTING SADDLE or SHOPPING FOR A SADDLE:
Place the Saddle Gauge on the horses back as described in Part 1 if you are testing a treed saddle. If you are testing an English saddle, then place the Gauge three fingers to the rear of the scapula. Record your numbers just in case it gets bumped and changed. Now you can bring your gauge to the saddle shop and place it on the underside of the saddle turned upside down. Gently place the gauge front paddle where the front concho is on a treed saddle, and if it’s an English saddle the front edge of the saddle is the first paddle. Check that the gauge is centered as well. What you are looking for is the same thing: the paddles to lie flat against the inside of the saddle tree. If there are voids where the paddles are not touching, or only touching in places, or it’s so narrow that it wants to move the paddles, then you’ll know it’s too narrow for your horse.
You can also do the opposite by placing the Saddle Gauge inside the saddle turned upside down, and then placing the Saddle Gauge up on the animal. Again, placing the Gauge in its appropriate location depending on the saddle type, the paddles should lay down against the body of the horse. Also, check fit with the saddle pad. You may find the fit is okay until you add the pad and suddenly it’s too narrow up front. You can try a thinner pad in that case.
NOTE: Ultimately consult with a professional saddle fitter to confirm your findings and do not rely on sweat or dry marks as a read for fit. In addition to using the Saddle Gauge, you’ll still need to sit the saddle on the horse with a pad to determine if there is clearance over the wither under the gullet, if it’s too long, rubbing on the back end, up too high in front (indicates too narrow) or too low in front (indicates too wide) both bare and ridden. The horse may be asymmetrical therefore it may fit on one side but not the other side. Some of these issues can be corrected. Consult a professional fitter who understands the entire subject of saddle fit.
PART 3: BUILDING A SADDLE ON A SPECIFIC TREE
You’ll need a roll of masking tape, 1” wide.
Step 1) Find the scapula of your horse. If you have a heavy muscled horse, your helper can lift the front hoof to expose the round backside of the scapula. After the hoof is back on the ground, place a short piece of tape the round edge of the scapula. It’s actually straight up from the “armpit”. You can feel it with your flat hand. Do the same to the other side.
For a western or endurance treed saddle: mark two fingers (toward the front) with tape/over the scapula. Remove the first piece of tape. We need you to mark a few fingers OVER the scapula so we can see if the tree needs to be flared to allow the shoulder to slide under the tree when moving. The first piece of tape is where the front paddle should be put each and every time you remove and place it back on the animal. Also note the spine of the gauge is right straight down the center of the back each and every time you place it on the animal.
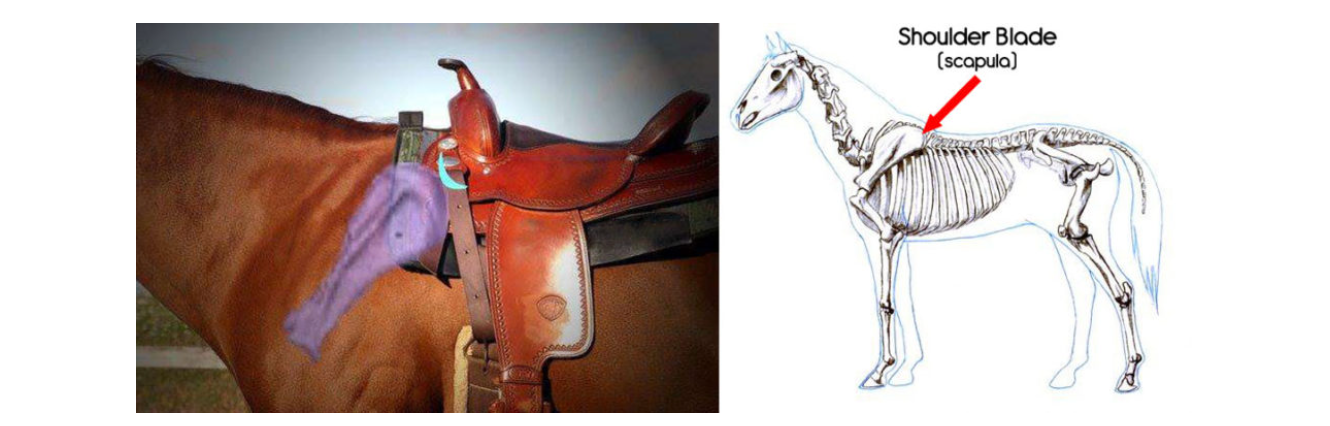
For an English or flocked underside saddle: mark with tape three fingers behind the scapula as this is where this type of saddle si
Step 2) Start at the front, pressing the right and left paddles against the body. It helps to have a helper look to make sure the paddles are on the animal not standing off. You may need to change the spine to achieve this. Do both sides checking for it being centered, and on the first piece of tape.
Step 3) Then move paddle #2, paddle #3 and so on, taking it off and on each time you need to change something checking to be sure you place it back on the front most piece of tape, and that it’s centered over the spine each time.
Step 4) Write down the spine numbers in pencil and the right and left paddle numbers too. Then do it again to make sure you did it correctly
Step 5) add your saddle pad that you plan to use and place the gauge on the pad in exactly the same location. If there are huge differences in how the paddles lay on the animal with the pad then readjust the gauge so that the gauge follows the shape of the pad.
Step 6) write down the new set of numbers circled on the form, that way there will be both sets of numbers. Some pads will really change the fit due to their thickness and if the contoured topline lifts the gauge off the body.
Most custom tree makers also want photos and videos. Consult with your saddle maker
Big thanks to Shelby Friml of Double Diamond Equine for making this awesome guide!
Check out Doublediamondequine.com to learn more and check out her awesome saddles! To download these instructions in PDF format,click here